WORKSHOPS
WHO
Groups of four people. Since there is so much information to cover about advanced carbon practices, it is recommended that workshop attendees have some experience printing in carbon or have an extensive background in alternative processes.
WHAT
A 10 day workshop ending in you being able to make multilayer double transfer carbon prints, and understanding important concepts about that process that will allow you to create your own methods to suit your own needs.
WHERE
In the Wet Print Studio in beautiful Valencia, Spain. See the studio
WHEN
Right now all workshops are booked for 2023, but sometimes there are cancellations. Contact me to be placed on the cancellation list for 2023. Next available carbon transfer workshops will be in 2027. In 2025 I plan to teach color theory, photogravure, and direct pigment workshops.
WHY
Understanding how the carbon process works will save you thousands of hours in failed attempts and allow you to make wise investments in equipment and materials. I’ll also give you all the carbon recipes I use, Photoshop curves, and samples of materials, so you can make prints with minimal effort. You will also walk away with a couple beautiful prints.
BASIC OUTLINE FOR THE WORKSHOP
Below is a basic outline, but sprinkled in-between we’ll be looking at everything included in the mind map shown below the outline. It’s a lot of material to get through, so students are encouraged to take lots of videos and photos. Students are also encouraged to have made a traditional single transfer carbon print before coming to the workshop.
Day 1– Yellow and burnt sienna layers of a color carbon print
Day 2- Magenta, cyan, and black layers of a color carbon print. During this time we will make a map of how to create a single, double or triple transfer print. This map will be very useful on day 6 when you are on your own to make a print.
Day 3- Clean borders of the prints, gloss layer, and double transfer
Day 4– Materials preparation day. Prepare: luster and matte paper, temporary support, and emulsion.
Day 5– Draw out all the steps for materials preparation from the previous day. Triple transfer, clear print, intro to calibration
Weekend to rest
Day 6– Students will be able to make a black and white print without my help.
Day 7– Calibration day. Just to give an idea of how fast paced this workshop is- I know of many workshops dedicated just to making digital negatives. They are usually two or three days and just cover calibration and making negatives. We’ll do it in two hours, then learn how to make tonal separations and ICC profiles. I highly recommend students read my book on calibration beforehand.
Day 8– Finish black and white prints. Review calibration. Start Theory
Day 9– Theory. We’ll have spent about 20 hours on theory by this point, but we’ll look at the really important things this day.
Day 10- Finish theory in the morning. In the afternoon we’ll package prints and negatives for safe travel, as well as samples of all the materials for you to reverse engineer and test. I’ll also give you all my recipes, curves, profiles, etc… and go over where to buy materials. Review notes and time for questions.
TOPICS TO COVER
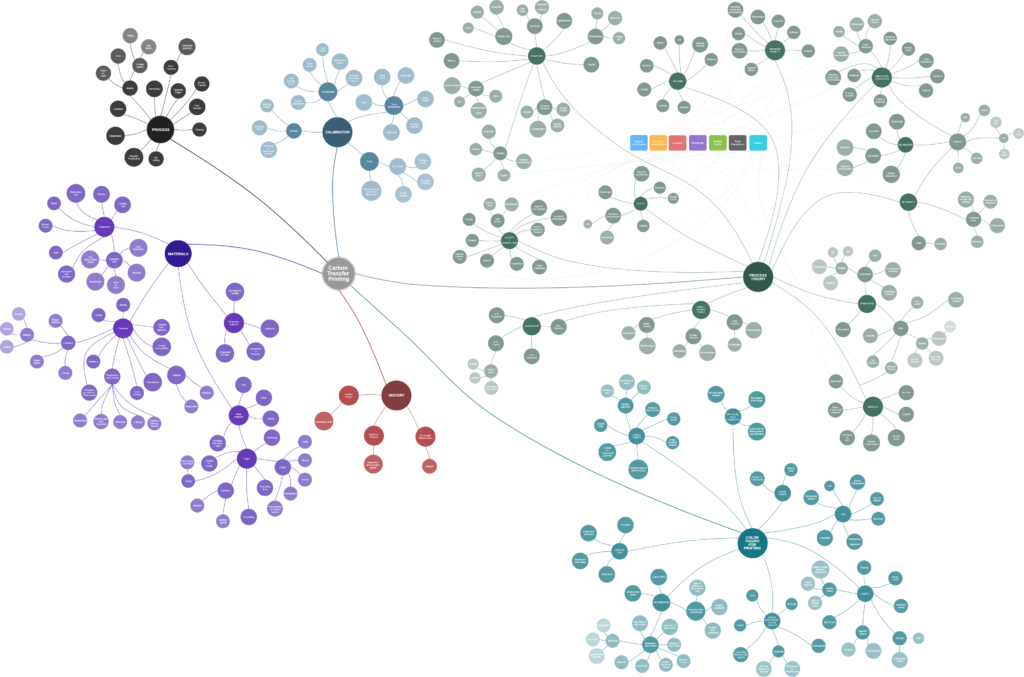
Below is a short list of what will be covered, but feel free to click on the mind-map above to download a full resolution version.
DAS instead of Dichromates: Looking at problems and solutions to staining, microbubbles, self masking, heat degradation, and stability.
Imagesetter Negatives: Why you should be using imagesetter instead of inkjet negatives. Design issues when making tissue for use with imagesetter negatives.
Pigments: Good and poor choices and how we can use different types to affect the final image.
Sizing Paper for Single/Triple and Double Transfer: Various sizing methods: comb, rod, roller, tray. Additives and how to make perfectly matte paper. Hardening for single/triple transfer
Toning Prints: Three different methods to tone prints.
Tonal Separations: How to choose the ink densities for the separations, and how to create the tonal separation curves.
Single Transfer Prints: If you don’t have any experience in carbon we can go over this in a morning.
Dark Effect: Why it happens and how to prevent it- importance of humidity, temperature, time, and ph.
Double Transfer and Multilayer Prints: Registration, reticulation, moisture control, mating, tissue design, etc…
Making Tissue: Recipes, instruction, and tricks so the emulsions come out perfect every time.
Miscellaneous: Exotic papers, metallic pigments, multiple double or single transfers to a single paper sheet, registration for carbon over platinum, and other weird stuff I might be trying at the moment.
Gloss Layer: How to add depth to the darks in your print when working on matte paper, or selectively control gloss in parts of a print.
Achieving good Density: Pigment choice, self masking, sensitizer, light source, max exposure time, perception of black.
How to Make CMYK Prints: How to design the tissue, make separations, and calibrate.
Color Theory and Color Pigments: Metamers, icc profiles, color spaces, colormaking attributes, lightfastness, and other concepts that will help you make color carbon prints.
Highlights: Why do highlights wash away, and how we can prevent it from happening. You should be able to easily reproduce 1-5% gray without any visible grain or defects.
BY THE END OF THE WORKSHOP...
You’ll be able to make a triple transfer color carbon print. You’ll also have the theory to understand what causes, and how to fix: frilling, blown out highlights, microbubbles, staining, misregistration, calibration errors, shiny specks, and many other problems that have simple solutions. This will allow you to focus on the artistic side of printing.
A word of caution- The carbon process is very time consuming, and is not for the faint of heart. You must be good at failing to be successful in carbon. The workshop will give you a huge base of knowledge to work off of, but you will have to put in the time to learn how to make a good print. I tell people to plan on about 500 hours of practice after the workshop before making a good print.
Costs for the workshop is 2250 euros