“What bloom gelatin to you use?” That’s the first and usually only thing I ever get asked about gelatin, but it also happens to be one of the least important aspects in choosing a quality gelatin for carbon printing.
In order of most important to least important, here are the things to look for in a quality gelatin for carbon printing.
1: Staining
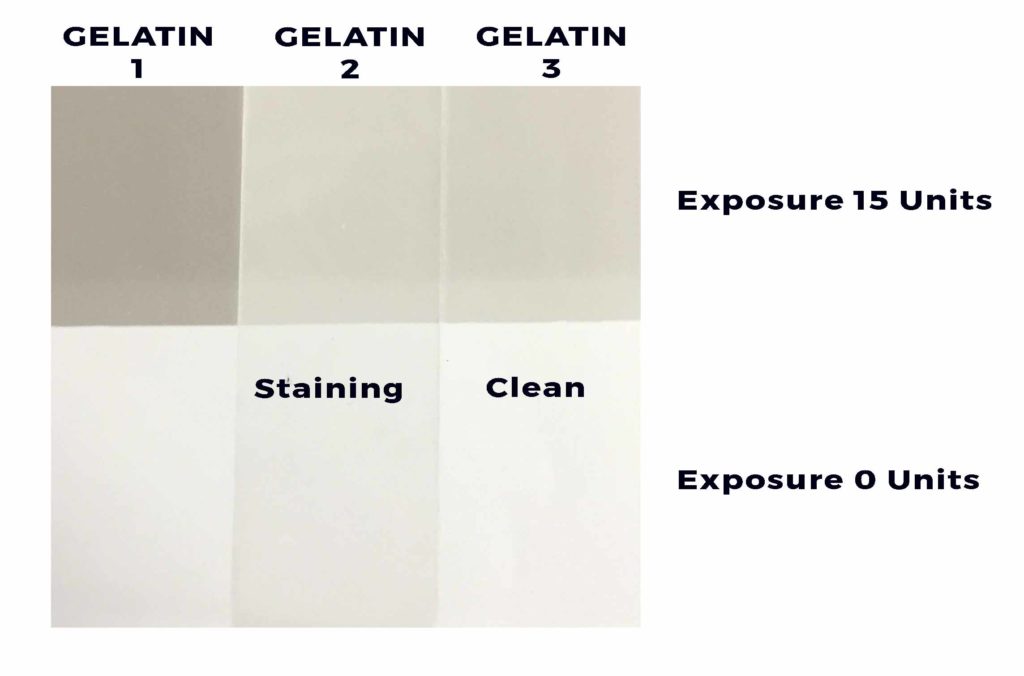
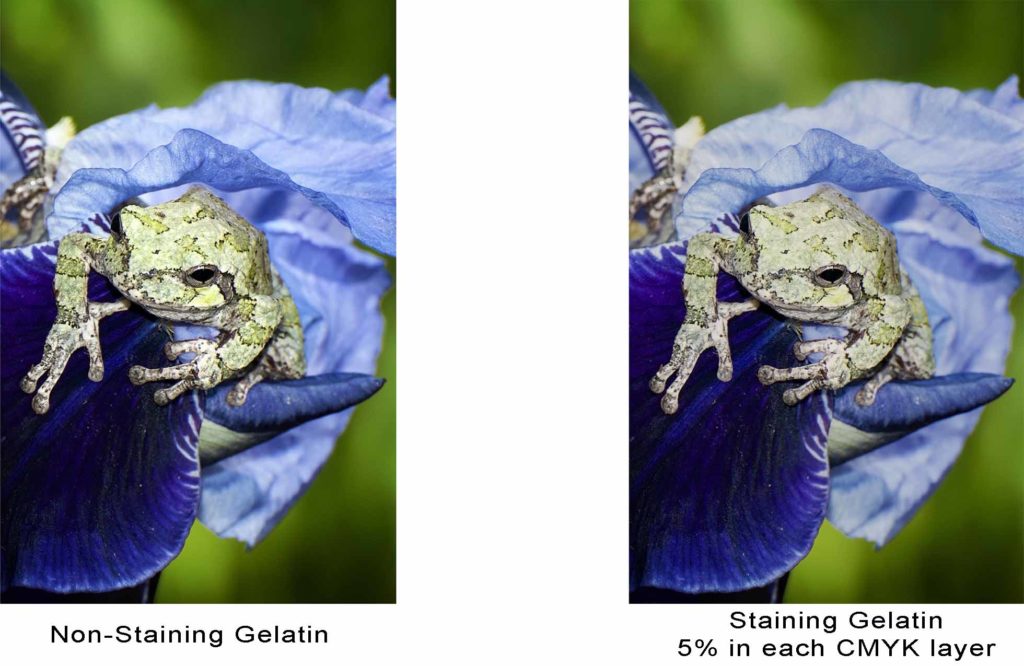
In the photo above you will see the middle gelatin caused the pigment to stain the paper. Instead of looking like the print on the left below with clean whites, if a staining gelatin is used then the print will look like the one on the right below.
2: Contrast
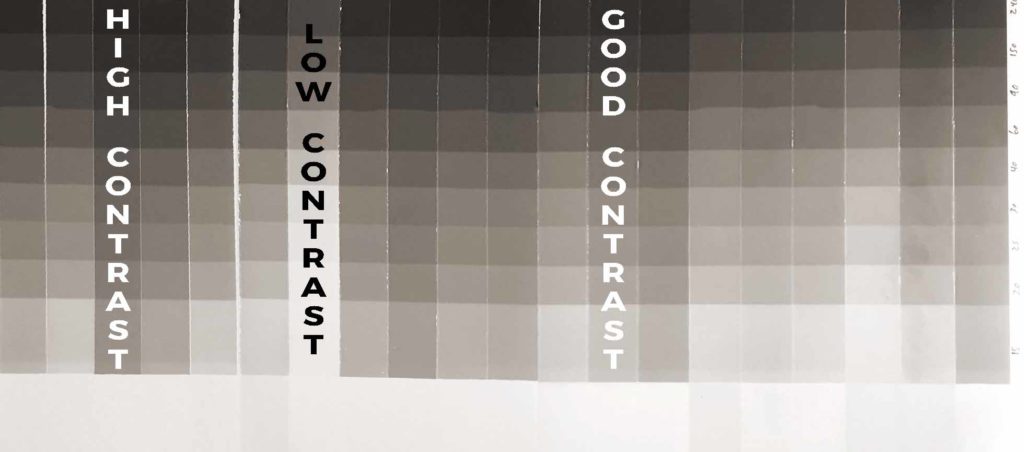
There are many ways to change the contrast of an emulsion, but changing the gelatin is often overlooked. This oversight can lead to frustration in getting clean highlights in a print, and deep rich blacks. In the test strips above, all tests were made with the same amount of pigment and sensitizer and exposed at the same time. The variation in contrast between the strips is quite remarkable. Use a gelatin that’s too high in contrast, and you will find that creating accurate tonal separations becomes an almost impossible task. Likewise, use a gelatin that is too low in contrast, and exposure times become ridiculously long. A good middle of the road gelatin is going to be the best for most prints.
3: Stability
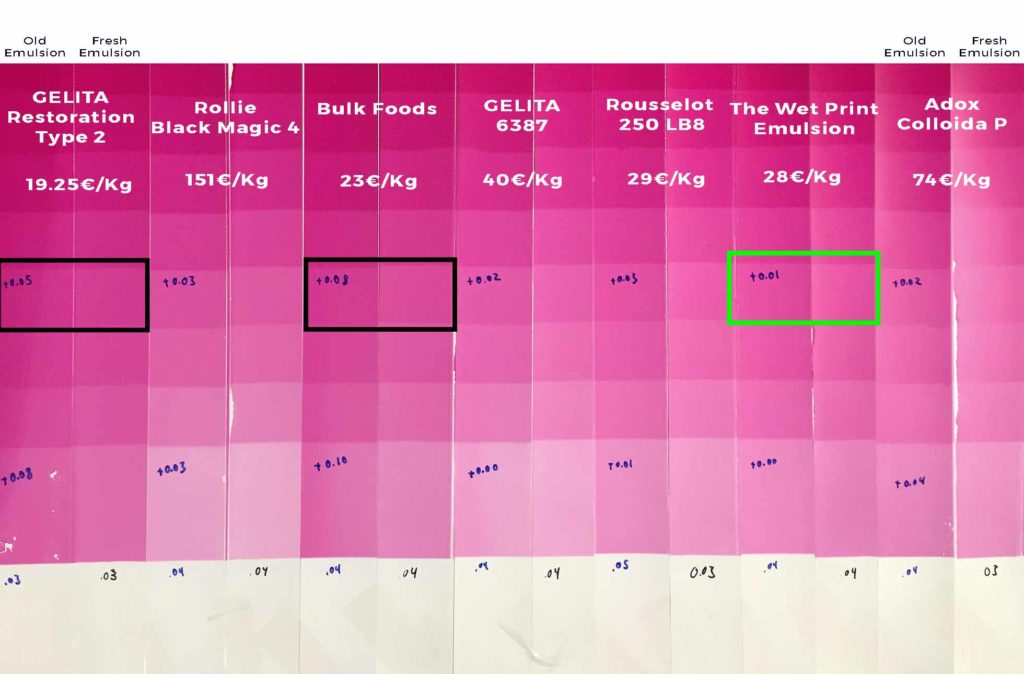
Some types of gelatin will cause an emulsion to change speed over time. Imagine shooting with ISO 100 film in January, but when you come back to use the film in June it has changed to ISO 200. Getting the correct exposure is like trying to hit a moving target. Below are some examples of stable and unstable samples of gelatin. The green square is best, while the black squares are going to make calibration a major headache. The numbers in blue marker are the change in density.
4: Clarity
When making color prints, using a yellowish gelatin will cause blues, turquoises, and cyans in the print to come out muddy. A clear gelatin will allow for brighter colors in a print.
On technical data sheets of gelatin samples the UV and visible transmission is usually indicated. To see if that has an effect on densities, I did a test by exposing patches of a single emulsion through 100 micron thick layers of dry gelatin. The variation of density between the various gelatin samples was minimal, so even a brownish gelatin is fine for black and white work.
For coating paper, clarity is by far the most important aspect to look at. A yellow gelatin will create a yellow paper when coated. A crystal-clear gelatin will give a nice clean look to a print, and the coating won’t be noticeable.
5: Bacteria
Below is a photograph of what happens when bacteria start to grow in an emulsion while it is drying. When poured the emulsion looks perfect, but when you come back in the morning, the emulsion is covered with small bubbles. Adding a bit of a biocide will prevent this, but using a gelatin that has a very low amount of bacteria to start off with will help and limit the amount of biocide needed.

6: Bloom
In the strip of tests at the top of this page, there are samples of gelatin ranging from 60 bloom to over 300 bloom, and they all work just fine. There might be a slight correlation between contrast and bloom, but it’s a stretch since the 60 bloom gelatin has the same contrast as some of the 290 bloom gelatins. The stronger gelatins take longer to bloom before melting and need a longer soak in the mating bath, but that’s about the only difference I’ve observed. That being said, usually the higher bloom gelatins are cleaner, and reserved as photographic or pharmaceutical grade by gelatin manufacturers, and tend to be more expensive.
7: pH
A gelatin’s pH is only important when working with dichromate as the sensitizer, which I strongly discourage for many reasons. However, if dichromate must be used for a specific unavoidable reason, a gelatin with a low pH will be more susceptible to the dark reaction due to the build up of chromic acid, leading to prints that come out too dark.
8: Mineral Content
I recommend a gelatin that has a low amount of calcium and other minerals, however, the cost for a gelatin with lower mineral content is also much higher.
9: Other Contamination
Modern gelatin is very clean, so it’s not often that you will run into problems with excess fat, ash, proteins, bone fragments, or gunk, but I’ve seen it in some very cheap technical gelatins. In food, photographic, or pharmaceutical grade gelatins there should be no problem.
10: Stickiness
After you soak an emulsion and squeegee off the excess water, take your finger and feel how sticky the gelatin is. Different gelatins and additives will affect the tack of the gelatin. In carbon printing, all we are doing is creating really fancy tape. If that tape is not sticky, the print will frill, detach, and bubble.
11: Hydrophobicity
It seems like some types of gelatin, more than others, become quite hydrophobic when taken out of a bath of water, squeegeed then resubmerged. This can cause problems with bubbles when mating to a temporary support.
Testing
Going through the process of testing different samples of gelatin is educational, and you will learn a lot, but testing all those aspects to find a good gelatin will probably cost over a thousand euros in gelatin, shipping, and materials, plus hundreds of hours testing over the course of a couple years. The multiple stability tests alone took me over two years to conduct. Then, if you find a gelatin that works well, minimum orders from manufactures are usually around 100kg, so plan on spending another two to four thousand euros.
I find this gelatin to work fairly well for emulsions.
If you find this information useful, please consider a donation.